Step-by-Step SharePoint 2013 Installation Guide Part-1
SharePoint 2013 is the new version of SharePoint and can only be installed on
Windows Server 2008 R2 with SP1 and Windows Server 2012. Since, I have
installed it for testing purpose only so I've used all the evaluation version
and express edition of software. You can also use full version of softwares if
you have. Below is the list of software needed to complete
this post.
After this series of post, you will have a good idea of
After installing Windows Server 2012, we are going to install and configure Active Directory Domain Services( ADDS) alongwith DNS and IIS Server.
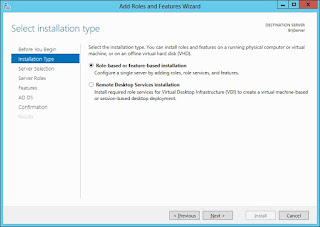
Open Server Manager and click on Add/Remove Server Role link. This will opens Add Roles and Features Wizard. Select Role-Based or Feature-based installation and then click Next.
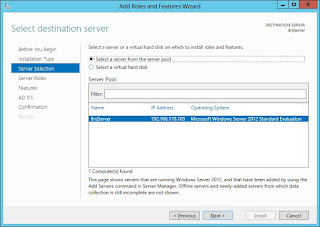
Select Name of your Server from Server Pool and click next.
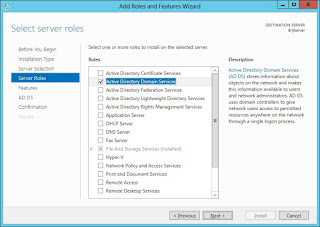
Select Active Directory Domain Services from the list of Roles.
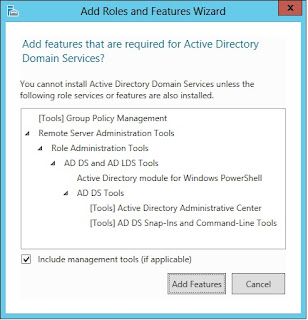
On selecting ADDS checkbox and new window will opens up with the list of features required for installing ADDS.Click on add features and Click next on Select Roles tab will leads us to Feature Selection Tab.
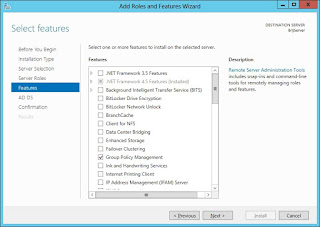
Select Group Policy Management from the list of features and click Next.
Active Directory Domain Service Tab opens up, click Next.

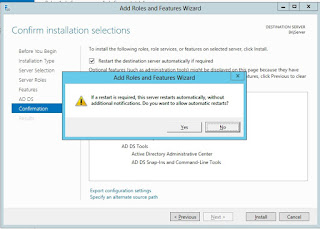
Now we are in confirmation Tab of the Wizard. Content of the tab includes all the roles and features that we have selected in previous steps. Select the checkbox "Restart the destination server automatically if required", on selecting checkbox a pop-up confirmation appears on the top of window click yes and then click Next.
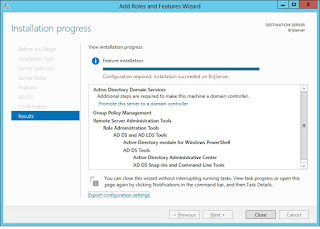
Installation of selected roles and feature started and progress will be displayed on the Results tab. You can export the setting that you have selected by clicking on the Export Configuration Settings in xml format.
Once the ADDS is installed wizard will automatically get closed. And AD DS Configuration wizard opens up. Select a new forest and then specify the root domain name and click next.

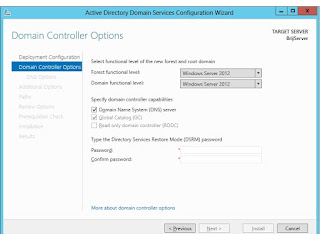
In the domain controller options tab, specify the DSRM password and click next. Leave the other settings as it is.
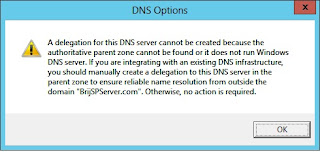
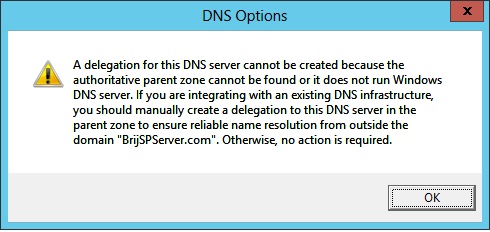
Now a DNS option tab opens and it shows a warning message "A delegation for this DNS server cannot be created because the authoritative parent zone cannot be found". Don't worry this a know issue in the list of http://technet.microsoft.com/library/cc754463.aspx. Click on Show more link and we will see a popup dispalying full message.
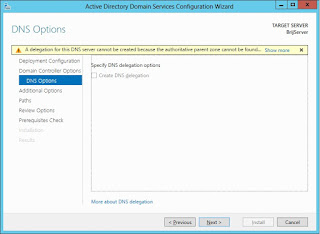
Just click OK, since we are not integrating our domain to existing DNS infrastructure, we don't need to create a delegation.
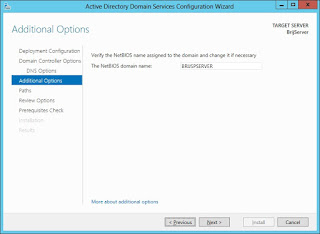
After clicking ok on dialog box, we will see Additional Options tab. In this tab wizard verifies the NetBIOS name and next to continue to next step.
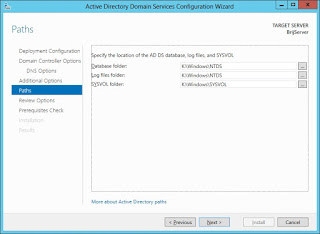
Paths tab will display the physical location for files in file system. If you want to change the location you can change the location by clicking button next to text box. Once done with your changes click next.
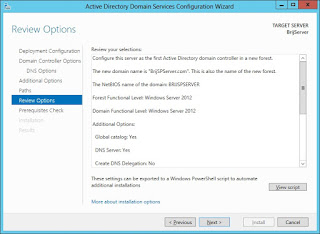
In the review step, you are displayed every option that you have selected previously. Review all you settings and once done click next. We can create the PowerShell script for the same, so that if we want to do it on other systems then no need to use this configuration waizard, we can automate the process and replecate the same settings.
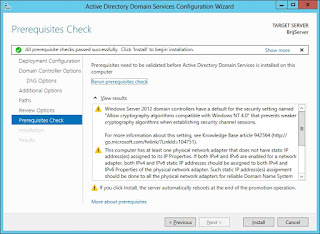
Since you done reviewing your settings, we on the Prerequisites Check tab. If you see "All prerequisite check passed successfully" then that means you can now install the settings. Otherwise you have to check which requirement fails in the result panel and resolve it and Rerun prerequisite check.
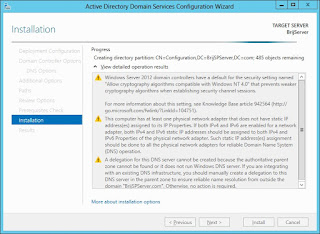
Below screen shows the installation progress.
Once installation done system will reboot automatically.

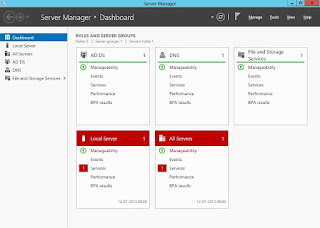
After reboot, you will see AD DS and DNS boxes in the Server Manager's Dashboard. That means you are done with the Active directory installation. Now you can create user in active directory for SharePoint.
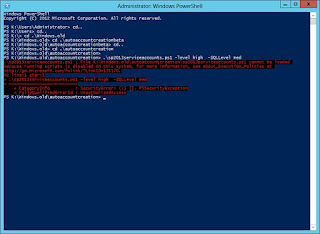
You can create users manually. But since I'm little bit lazy person so, I've used this powershell script available on this link SharePoint 2013 Service Account Creater. This script contains multiple configurations for creating users in Active Directory.
I'm running the script in SharePoint high and SQL low mode.

You might get error saying script running is disable on this system. Don't worry, just run the below script and rerun the powershell script.
Get-ExecutionPolicy
Set-ExecutionPolicy Unrestricted
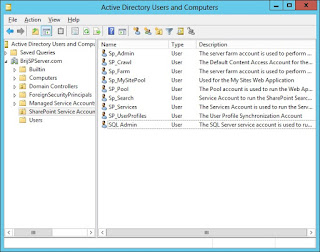
Open the Active Directory Users and Computers snap-in. There you will see SharePoint Service Accounts OU.
Now we done the setting in AD DS, DNS and creating user accounts required for SQL and SharePoint. In the next blog post I'm going to describe installations step for SQL Server 2012.
Software Requirement
- Windows Server 2012 180 days evaluation.
- SQL Server Express 2012
- SharePoint Server 2013 180 days Trial.
Hardware Requirement
For installing SharePoint 2013 we need 64-bit system with minimum 8 GB RAM and 80 GB Hard-Disk space. Although you can install it in system with 4GB RAM also, but performance wise it will run slow and probably get hanged when doing some tidious work.After this series of post, you will have a good idea of
- Installation and configuration of Windows Server 2012
- Installation of SQL Server 2012 Express Edition.
- Installation and configuration of SharePoint 2013.
Get Started
In this post we are going to cover step 1, i.e. Installation and configuration of Windows Server 2012.After installing Windows Server 2012, we are going to install and configure Active Directory Domain Services( ADDS) alongwith DNS and IIS Server.
Open Server Manager and click on Add/Remove Server Role link. This will opens Add Roles and Features Wizard. Select Role-Based or Feature-based installation and then click Next.

Select Name of your Server from Server Pool and click next.

Select Active Directory Domain Services from the list of Roles.

On selecting ADDS checkbox and new window will opens up with the list of features required for installing ADDS.Click on add features and Click next on Select Roles tab will leads us to Feature Selection Tab.

Select Group Policy Management from the list of features and click Next.

Active Directory Domain Service Tab opens up, click Next.

Now we are in confirmation Tab of the Wizard. Content of the tab includes all the roles and features that we have selected in previous steps. Select the checkbox "Restart the destination server automatically if required", on selecting checkbox a pop-up confirmation appears on the top of window click yes and then click Next.

Installation of selected roles and feature started and progress will be displayed on the Results tab. You can export the setting that you have selected by clicking on the Export Configuration Settings in xml format.

Once the ADDS is installed wizard will automatically get closed. And AD DS Configuration wizard opens up. Select a new forest and then specify the root domain name and click next.

In the domain controller options tab, specify the DSRM password and click next. Leave the other settings as it is.

Now a DNS option tab opens and it shows a warning message "A delegation for this DNS server cannot be created because the authoritative parent zone cannot be found". Don't worry this a know issue in the list of http://technet.microsoft.com/library/cc754463.aspx. Click on Show more link and we will see a popup dispalying full message.

Just click OK, since we are not integrating our domain to existing DNS infrastructure, we don't need to create a delegation.
After clicking ok on dialog box, we will see Additional Options tab. In this tab wizard verifies the NetBIOS name and next to continue to next step.

Paths tab will display the physical location for files in file system. If you want to change the location you can change the location by clicking button next to text box. Once done with your changes click next.

In the review step, you are displayed every option that you have selected previously. Review all you settings and once done click next. We can create the PowerShell script for the same, so that if we want to do it on other systems then no need to use this configuration waizard, we can automate the process and replecate the same settings.

Since you done reviewing your settings, we on the Prerequisites Check tab. If you see "All prerequisite check passed successfully" then that means you can now install the settings. Otherwise you have to check which requirement fails in the result panel and resolve it and Rerun prerequisite check.

Below screen shows the installation progress.

Once installation done system will reboot automatically.

After reboot, you will see AD DS and DNS boxes in the Server Manager's Dashboard. That means you are done with the Active directory installation. Now you can create user in active directory for SharePoint.

You can create users manually. But since I'm little bit lazy person so, I've used this powershell script available on this link SharePoint 2013 Service Account Creater. This script contains multiple configurations for creating users in Active Directory.
I'm running the script in SharePoint high and SQL low mode.
You might get error saying script running is disable on this system. Don't worry, just run the below script and rerun the powershell script.
Get-ExecutionPolicy
Set-ExecutionPolicy Unrestricted

Open the Active Directory Users and Computers snap-in. There you will see SharePoint Service Accounts OU.

Now we done the setting in AD DS, DNS and creating user accounts required for SQL and SharePoint. In the next blog post I'm going to describe installations step for SQL Server 2012.


This comment has been removed by a blog administrator.
ReplyDelete